From CLARITY Wiki
(→Chamber construction procedure) |
(→Solder holes for fittings) |
||
| Line 7: | Line 7: | ||
===Solder holes for fittings=== |
===Solder holes for fittings=== |
||
Solder holes into the marked areas of the Nalgene container. Once the hole is big enough, screw in the inlet/outlet fitting while the plastic is still hot and melted. The fitting does not need to be fully screwed in, but it should be inserted just enough such that it cannot be easily pulled out by tugging. Solder the holes for the electrode fittings, and insert the smaller end of the electrode fitting into the container while the plastic is still melted. |
Solder holes into the marked areas of the Nalgene container. Once the hole is big enough, screw in the inlet/outlet fitting while the plastic is still hot and melted. The fitting does not need to be fully screwed in, but it should be inserted just enough such that it cannot be easily pulled out by tugging. Solder the holes for the electrode fittings, and insert the smaller end of the electrode fitting into the container while the plastic is still melted. |
||
| − | <gallery> |
+ | <gallery widths=100px> |
File: Soldering_step1.png|Soldering |
File: Soldering_step1.png|Soldering |
||
File: Soldering_step2.png|Soldering hole |
File: Soldering_step2.png|Soldering hole |
||
| Line 17: | Line 17: | ||
<br clear=all> |
<br clear=all> |
||
| − | |||
===Add epoxy to seal=== |
===Add epoxy to seal=== |
||
Revision as of 05:39, 16 April 2014
Contents |
Chamber construction procedure

Mark the plastic container
Screw down the cap of a 60 mL Nalgene container tightly. While tightly shut, mark the areas to be soldered for the inlet (bottom) and outlet (top) fittings, making sure that they are on the same plane and on opposite sides of the container. Also, mark the spots to be soldered for the electrode fittings. The spots should be near the bottom of the chamber on the opposite side of the inlet fitting. One electrode fitting should be placed on either side of the inlet with plenty of room to fit a sample holder between the two electodes. Mark the top and bottom of the container with some type of symbol or initials in order to be able to identify matching caps and bottoms later on (if making more than one chamber).
Solder holes for fittings
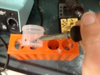
Solder holes into the marked areas of the Nalgene container. Once the hole is big enough, screw in the inlet/outlet fitting while the plastic is still hot and melted. The fitting does not need to be fully screwed in, but it should be inserted just enough such that it cannot be easily pulled out by tugging. Solder the holes for the electrode fittings, and insert the smaller end of the electrode fitting into the container while the plastic is still melted.
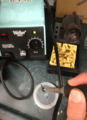
Soldering
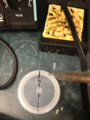
Soldering hole
Screw in fitting
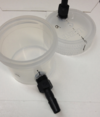
Inlet/outlet complete
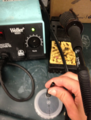
Soldering holes for electrode fittings
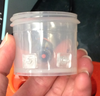
Electrode fittings in chamber


Add epoxy to seal
Apply epoxy around the junctures of the inlet/outlet fittings on both the inside and outside of the container. Avoid getting epoxy into the inside of the fitting so that the inlet/outlet does not seal shut. Epoxy only the outside squares of the electrode fittings to the container, making sure to leave the fitting interior clear for electrode insertion. Use a slow-drying epoxy to allow seepage into the junctures and let dry overnight with each epoxy application.
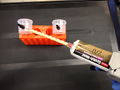
Applying epoxy to outside of inlet
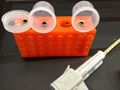
Epoxy drying on inside of chamber inlets


Construct platinum wire electrodes
Add epoxy to seal
Cover with foil (if desired)
Alternative fittings
- Push-to-connect fittings for better leakage control
- Banana plug fittings for electrodes to prevent platinum wire breakage from alligator clips
Alternative chambers
- 3-D printed
- 3-D ceramic
- 125 mL Nalgene for larger tissues