Chamber Construction
From CLARITY Wiki
(Difference between revisions)
(→Chamber construction procedure) |
|||
| Line 1: | Line 1: | ||
==Chamber construction procedure== |
==Chamber construction procedure== |
||
===Mark the plastic container=== |
===Mark the plastic container=== |
||
| + | [[File: Marked_chamber.jpg|thumb|100px|text-top]] |
||
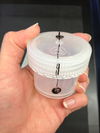
| + | Screw down the cap of a 60 mL Nalgene container tightly. While tightly shut, mark the areas to be soldered for the inlet and outlet fittings, making sure that they are on the same plane and on opposite sides of the container. |
||
==Alternative fittings== |
==Alternative fittings== |
||
| Line 9: | Line 11: | ||
*3-D printed |
*3-D printed |
||
*3-D ceramic |
*3-D ceramic |
||
| + | *125 mL Nalgene for larger tissues |
||
Revision as of 08:08, 3 December 2013
Contents |
Chamber construction procedure
Mark the plastic container
Screw down the cap of a 60 mL Nalgene container tightly. While tightly shut, mark the areas to be soldered for the inlet and outlet fittings, making sure that they are on the same plane and on opposite sides of the container.
Alternative fittings
- Push-to-connect fittings for better leakage control
- Banana plug fittings for electrodes to prevent platinum wire breakage from alligator clips
Alternative chambers
- 3-D printed
- 3-D ceramic
- 125 mL Nalgene for larger tissues
